
It’s no secret that computers can get hot. Processors in particular can get hot enough to fry an egg – or the internal circuitry. For most PCs, one or two fans, along with the GPU fan, is sufficient to keep your PC cool. But suppose you don’t have an average PC. Suppose you’re rocking a slick gaming rig with an overclocked processor, dual GPUs, and RGB lighting? In that case, you have a few different options. First, you could use aliquid cooling system. However, these can be complex and difficult to install. Another option is to add someexternal cooling fans. But these will only work if you have the right kind of case.
For most people, the best option is to install multiple internal fans. But this presents its own set of hurdles. Most motherboards have a maximum of two fan controllers. If you want to run more fans, you need a secondary fan controller to plug them all in. Recently, we reviewed somefront panel fan controllers. These controllers are a great choice if you want to have manual control over your fans. You don’t need to mess around with adjusting your BIOS or running third-party software to change the speed. But they also take up a lot of space in the case, and occupy a 5.25-inch drive bay. Depending on your setup, this may not be ideal.
一个很好的替代方法是使用一个简单的风扇中心有限公司ntroller. These are compact devices, similar to a USB hub. But they mount inside your PC, and they’re equipped with fan controllers instead of USB ports. Today, we’re about to review three of the best PWM fan hub controllers on the market. First up is the DeepCool Fan Hub Control. This is a simple, four-fan hub that’s entirely powered by your motherboard’s fan controller. Next up is the Thermaltake Commander FP. This hub can control up to 10 fans, enough to keep even the hottest gaming rig cool as a cucumber. Finally, we’ll check out the SilverStone PWM Fan Hub. This is a slightly smaller 8-fan controller, with advanced circuitry for smoother performance.
PWM Fans vs. 3-Pin Fans
Before we go any further, it’s important to understand exactly what a PWM fan is. PWM is short for “Pulse Width Modulation”, an electrical term for a power supply that pulses. So instead of feeding your fan a steady 12 volts of power, your fan gets brief, rapid pulses every few milliseconds. The longer and faster the pulses, the closer the fan gets to a full 12 volts. By using this method, the fan can fine-tune its own speed.
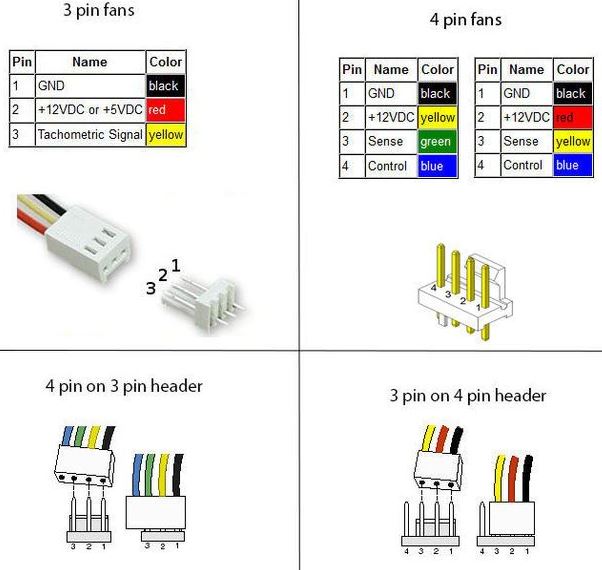
So, how is this different from a 3-pin fan? A 3-pin fan receives a steady voltage. Instead of using PWM, the fan draws between 5 and 12 volts of power. The higher the voltage, the faster the fan spins. Pretty simple, right? With a 3-pin fan, the speed is typically controlled by the motherboard or a third-party fan controller. The hotter the PC gets, the more power the fan will get for cooling.
The main advantage of a PWM fan isn’t actually for high-performance applications. A 3-pin fan can keep your PC just as cool as a PWM fan. The advantage comes when your computer is idling. Let’s say your PC is in your bedroom, and you turn off your RGB lights so you can sleep at night. Suddenly, your PC doesn’t need nearly as much cooling capacity. Most fan motors will die if the voltage drops below 5 volts. As a result, a 3-pin fan will still be running faster than it needs to on an idling PC. A PWM fan, on the other hand, can run at exceptionally low speeds, well below 500 RPM. This can extend your fan’s life, as well as saving power.
We should point out that a 3-pin fan will still work if you plug it into a PWM controller. However, since there’s no fourth pin for the PWM function, the fan will draw a steady 12 volts. In other words, it will be running full-speed-ahead at all times. So you’re much better off using a 4-pin fan on your 4-pin controller. You’ll also want to set a temperature level in your BIOS. Otherwise, even your 4-pin fan will run at a constant 12 volts. If you’d rather not mess around with your BIOS, there are third-party apps that will do the job for you. Now, let’s get on with the reviews!
DeepCool Fan Hub Control
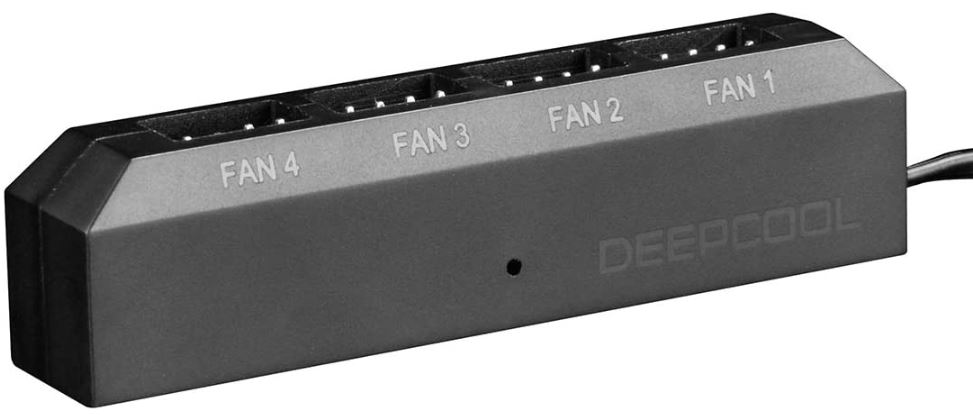
TheDeepCool Fan Hub Controlis very compact, measuring 3.4 inches long, 1.5 inches tall, and 1 inch thick. This small form factor makes it very easy to install just about anywhere on the inside of your case. Find a good spot for it, slap the double-sided tape on the side, and stick it to the inside of your case. You don’t need to mess around with screws or any other installation complications.
The sides of the hub slope gently towards the top, where you’ll find four fan ports. Each port is labeled, “Fan 1”, “Fan 2”, “Fan 3”, or “Fan 4” in a light grey lettering. This makes it easy to keep track of which fan is which when you’re doing your installation. With this port configuration, cable management is very easy. You’ve got all four cables coming out of the same side. So a couple of zip ties will be all you need to keep your build nice and clean.
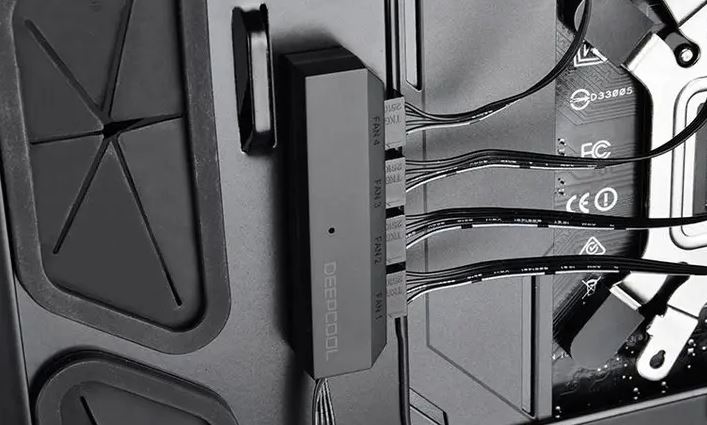
From one end of the unit, a 1-foot cable connects to your motherboard’s fan header. Since you’re only running a maximum of four fans, the fan header will supply sufficient power for the job. Because of this, you won’t need to run a separate SATA cable to power your fans. Not only does this further improve cable management, it also means you don’t need to waste a SATA cable.
How it Works
The DeepCool Fan Hub Control relies on your motherboard to control the PWM function. So make sure to check your BIOS to ensure the settings are where you want them. Keep in mind that you’re still connecting to your motherboard via a single fan cable. As a result, the motherboard will only be able to “see” the fan in the “Fan 1” slot. It will still control all the other fans, but it will be getting its RPM information from the first fan. In addition, if your fans have thermal sensors, your motherboard will only see thermal data from Fan 1. If you’re using less than four fans, make sure one of them is plugged into the “Fan 1” slot. Otherwise, the motherboard will simply deliver full power as if a 3-pin fan was connected.
Thermaltake Commander FP
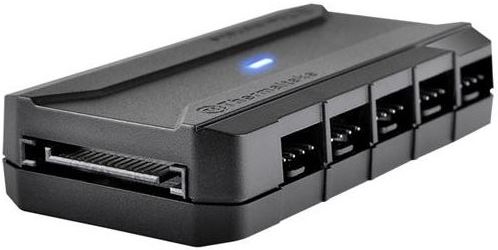
TheThermaltake Commander FP有点更强大比DeepCool单位。它的措施es 3.2 inches in length, 1.7 inches in width, and 0.7 inches thick. However, this size is necessary to support the whopping 10 fans it’s capable of running. In order to power all those fans, you’re going to need to use SATA power. On one side of the unit, you’ll see a SATA input for plugging into your power. On the other end, a 1-foot fan lead will connect to your motherboard’s fan controller.
The unit itself is attractive to look at. It’s constructed from black ABS plastic, with a pair of embossed Thermaltake logos on the top. There’s also a blue LED light in the center, which indicates when SATA power has been connected. The fan ports themselves are located along the sides of the unit, with five on each side. Admittedly, cable management can be a pain. But considering the sheer number of cables, Thermaltake makes it as easy as possible. The kit comes with five reusable beaded cable ties to help you out. But if you’re actually running the maximum of 10 fans, you’ll want to have a few more on hand.
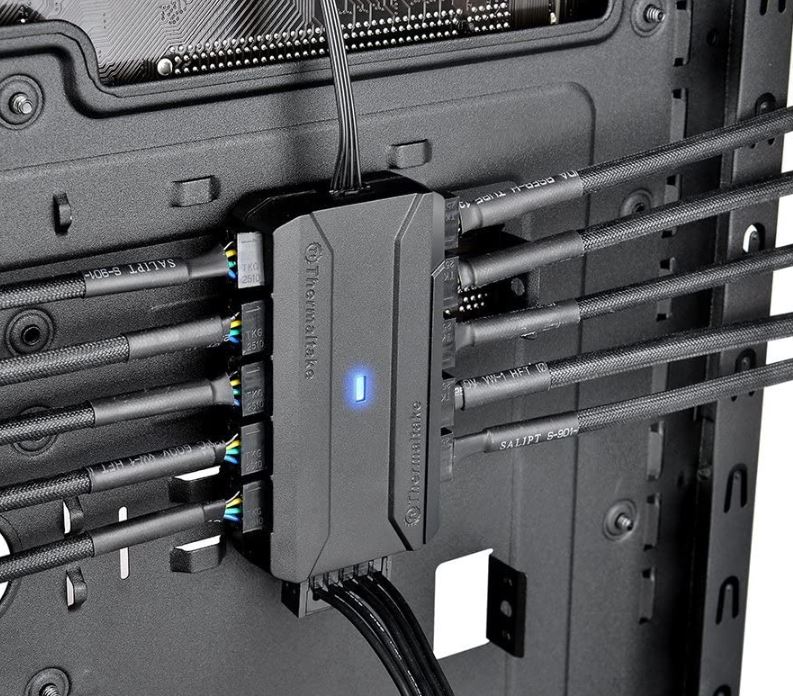
Instead of installing with double-sided tape, the Commander FP installs with a pair of velcro tabs. This is convenient if you want to take the hub out to easily access some ports. It also won’t gum up the inside of your case if you end up removing or repositioning the hub permanently. You also get Thermaltake’s 1-year manufacturer’s warranty.
How it Works
The Thermaltake Commander FP works similarly to the DeepCool Fan Hub Control. It has a single, primary port that communicates with the motherboard. In this case, it’s the port at the motherboard-side of the controller, the one with the recessed casing. As with any fan hub controller, you should use the same make and model fan in each port. If you’re using different makes and models, the needed voltage will not be the same for all of them. As a result, some of your fans will be running either too fast or too slow.

SilverStone PWM Fan Hub
TheSilverStone PWM Fan Hubis an 8-port fan hub that’s exceptionally compact. It measures 2.13 inches long, 1.57 inches wide, and 0.75 inches thick. At this size, you can mount it just about anywhere inside your PC case. That said, make sure to get yourself some velcro or double-sided tape. It doesn’t ship with any mounting supplies.
The case is constructed from black ABS plastic, so it’s fairly sturdy. On the top, you’ll see a white SilverStone logo. There’s also a set of grooves on one side, which forms an offset “T”. The eight fan ports are located on the sides, with four on each side. This design makes cable management relatively easy. On the other hand, there are no zip ties included in the kit. You’ll need to provide your own.
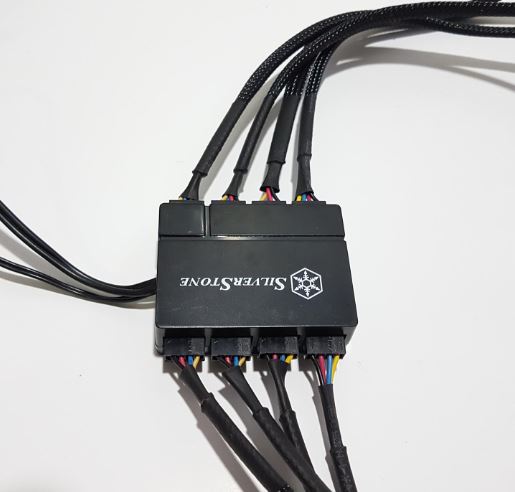
Like any powerful fan hub, the SilverStone hub requires a SATA power input. The SATA input is located on the front of the unit. At the other end, you’ll find the 1-foot motherboard fan controller connection. Plug in both of these, connect your fans, and you’re ready to rock.
How it Works
If you’ve been paying attention so far, you probably know what we’re about to say. The motherboard can only “see” a single fan. In this case, that would be the fan that’s set apart by a set of grooves.
The SilverSTone PWM Fan Hub also sports a 2,200μF capacitor. This capacitor will draw power from the motherboard until it’s fully charged. After that, it serves as a power reserve. If the motherboard power dips, the capacitor will compensate, ensuring that your fans receive a steady supply of power. As a result, your fans will run at the proper speed regardless of
Final Verdict
Clearly, each one of these PWM fan hub controllers has something to offer. But which one is the best choice for you? If you’re only running four or fewer fans, theDeepCool Fan Hub Controlis the obvious choice. Its main advantage is that you don’t need to tie up a SATA cable just to run your fans. It’s also easy to install, and allows for easy cable management. On the other hand, if you want to add more fans later, you’re going to be out of luck.
Next, we looked at theThermaltake Commander FP. This fan hub is exceptionally powerful, with the ability to run up to 10 fans. It’s also attractive, with an LED light on the top. On the one hand, if you’re running that many fans, cable management is going to be a challenge. On the other hand, the port positioning makes it as painless as possible.
Finally, we looked at theSilverStone PWM Fan Hub. The SilverStone hub isn’t as attractive-looking at the others, but it gets the job done. You can operate up to eight fans, which should be sufficient for any rig. It’s significantly smaller than the Thermaltake hub, for easier positioning. Not only that, but the internal capacitor does a great job of compensating for voltage fluctuations.


Hello; I have a cpu case with four, two wire fans. My motherboard supports four, four pin fans for PWM functions. I want to use the MB to control my fan speeds in the bios (all four are running full speed from the psu at present). What is the best solution for accomplishing that, do I have to get all new fans, or is there some other way to control the ones I already have? Thanks